Eisen's Blog
使用 ansible 为 ubuntu 设置代理
2021 December-30
最近为一些藏在防火墙里的存储节点做 provision 由于是非常受限的外网访问,必须要通过代理访问网络,因此需要对原来的 ansible 脚本做修改,这里做一个记录。
看了看 ansible 里面的内容以及后续的 k8s 的流程,无非是如下几个方面需要访问外网:
- curl 一些 github 上的一些公钥
- apt install
- k8s 拉镜像
那么,对应的就是以下三个方面的代理配置:
- http_proxy / https_proxy 环境变量配置
- apt 不走环境变量的代理,需要单独配置下
- 我这里依然使用的 docker 拉镜像的时候也要做独立的配置,不过在一篇 旧文- 国内环境下更好的 docker 镜像获取 已经介绍过了
设置全局环境变量
根据 ansible 的文档 Setting remote env ansible 提供了 environment 的关键词,可以在 task play 等不同层级添加环境变量:
- hosts: all
  remote_user: root

  tasks:

    - name: Install cobbler
      ansible.builtin.package:
        name: cobbler
        state: present
      environment:
        http_proxy: http://proxy.example.com:8080
- hosts: testing
roles:
- php
- nginx
environment:
http_proxy: http://proxy.example.com:8080当然,我们这里就没什么外网,那自然就走一个全局的。
添加 apt 的 proxy 配置
apt 的 proxy 需要放到 /etc/apt/apt.conf.d 下,格式如下:
Acuire::http { Proxy "http://proxy:1234" }
Acuire::https { Proxy "http://proxy:1234" }
写成一个 ansible task 就是下面这个样子:
- name: add proxy for apt
  copy:
    dest: /etc/apt/apt.conf.d/02proxy
    content: |
      Acquire::http { Proxy "{{ http_proxy }}" }
      Acquire::https { Proxy "{{ https_proxy }}" }
其中 http_proxy 和 https_proxy 抽出来做为变量后面填写进来。
添加 docker 的 proxy
在上面提到的旧闻中讲过了,启动 docker 的时候需要配置环境变量,放到 systemd 的配置 /etc/systemd/system/docker.service.d/http-proxy.conf 中:
[Service]
Environment="HTTP_PROXY=http://proxy:1234"
Environment="HTTPS_PROXY=http://proxy:1234"
然后需要执行命令 systemctl daemon-reload。
放在一起
放在一起差不多就是这个样子:
roles/proxy/tasks/main.yml:
---
- file:
    dest: /etc/systemd/system/docker.service.d
    state: directory
- name: add docker proxy settings
  copy:
    directory_mode: yes
    dest: /etc/systemd/system/docker.service.d/http-proxy.conf
    content: |
      [Service]
      Environment="HTTP_PROXY={{ http_proxy }}"
      Environment="HTTPS_PROXY={{ https_proxy }}"
- name: reload docker
  service:
    name: docker
    state: restarted
    daemon_reload: yes
- name: add proxy for apt
  copy:
    dest: /etc/apt/apt.conf.d/02proxy
    content: |
      Acquire::http { Proxy "{{ http_proxy }}" }
Acquire::https { Proxy "{{ https_proxy }}" }entry.yml:
---
- hosts: nodes
  vars:
    http_proxy: "http://proxy:7890"
    https_proxy: "http://proxy:7890"
  environment:
    http_proxy: "http://proxy:7890"
    https_proxy: "http://proxy:7890"
  roles:
  - role: proxy
更好的方案
有没有更好的方案?我觉得有,就是用 tun2socks 的方案,可以实现以上三个方面的代理设置。不过还没很仔细的折腾,等搞定了再做记录。
spring boot 整理 SpringBootApplication
2021 December-23
早在 2017 年有写过一些 spring boot 测试相关的内容,比如 在 Spring Boot 1.5.3 中进行 Spring MVC 测试,再比如 把 Spring Boot 1.5.3 与 MyBatis 集成。现在都 2021 年马上 2022 年了,spring boot 的最新版本已经来到了 2.6,其所依赖的一系列东西也发生了不少变化。同时随着我们项目变得越来越大,测试用例越来越多,对测试的性能、标准化的要求也越来越迫切。从这篇开始记录一些自己最近翻看 spring test 以及 spring boot test 了解到的有关 spring 测试体系的内容。
spring 以及 spring boot 测试相关的内容简单 google 一下就能看到很多,但我个人感觉非常不成体系,这个应该也和 spring 不断的更迭关系很大,很多新旧知识掺杂在一起,有点摸不清楚。这里我参考的核心资料是如下两个:
翻看了这两部分内容后感觉 Spring 的文档写的还是比较全面的,不过很遗憾 Spring Testing 的内容写的还是不够细致,可能需要自己去结合源码和其他资料才能更好的消化吸收。但我觉得确实比直接在其他地方要系统一些。
今天先介绍最近消化的第一个 Tips 什么不应该放进 @SpringBootApplication。
@SpringBootApplication 简单介绍
@SpringBootApplication 是一个集成注解,翻看源码可以看到它包含了额外三个注解:
@SpringBootConfiguration: 作为 SpringBoot 默认的 Configuration Class@EnableAutoConfiguration: 允许 Auto Configuration@ComponentScan: 支持 Component Scan 的方式提供各种Bean
添加这个注解的 Class 也通常就是整个应用的入口了。在这里可能会放一些全局初始化的东西,不过根据 Spring Boot Testing 的 User Configuration and Slicing 介绍,这里反而不是那种什么都可以放的地方,随便放各种东西会影响你的测试依赖。
为什么 SpringBootApplication 不能添加各种依赖
这样从 Spring Boot 写测试通常使用的 @SpringBootTest 和 @WebMvcTest 注解的行为做解释了。
通常来说,如果我们的依赖链条都是靠我们自己去切断,不依赖 Spring 的 ApplicationContext 那么这种测试就算是 Unit Test 。反之任何需要依赖 ApplicationContext 的都可以称为 Integration Test。面向 WebMvc 或者需要和数据库接触的测试都需要 ApplicationContext 而这个 ApplicationContext 如何建立就是靠的 @SpringBootTest 或者 @WebMvcTest 这样的注解了。
标记 @SpringBootTest 或者其他 Spring Boot 提供的 @*Test 注解的测试会尝试寻找从根目录开始寻找标记了 @SpringBootApplication 或者 @SpringBootConfiguration 的类,并以它为起点加载完整的 ApplicationContext 。在 Spring Boot 的 Detecting Test Configuration 文档里也做了说明:
When testing Spring Boot applications, this is often not required. Spring Boot’s @Test annotations search for your primary configuration automatically whenever you do not explicitly define one.
The search algorithm works up from the package that contains the test until it finds a class annotated with @SpringBootApplication or @SpringBootConfiguration. As long as you structured your code in a sensible way, your main configuration is usually found.
当然也可以通过增加 classes 参数 explicitly define 一个 Configuration 修改其默认搜索的行为:
@SpringBootTest(classes = {GraphQLTestConfiguration.class, DgsAutoConfiguration.class})
@Import(CustomDataFetchingExceptionHandler.class)
@RunWith(SpringRunner.class)
public abstract class GraphQLTestBase extends TestBase {}
应该如何修改
在文档的 User Configuration and Slicing 部分有做介绍:
Test slices exclude @Configuration classes from scanning.
但是 @SpringBootApplication 默认的 @ComponentScan 可不会跳过任何 @Configuration 因此,为了让全局的依赖注入不要污染不必要的 Test Slices 可以把额外的依赖注入放在单独的 @Configuration 下,这里我直接超文档的内容:
@SpringBootApplication
@EnableBatchProcessing
public class MyApplication {

    // ...

}
修改为
@Configuration(proxyBeanMethods = false)
@EnableBatchProcessing
public class MyBatchConfiguration {

    // ...

}
总结
@SpringBootApplication自带ComponentScan会收集自己 package 下所有的 Beans 和 Configurations- Spring Boot 提供的
@*Test会自己搜索@SpringBootApplication或者@SpringBootConfiguration作为默认的Configuration,除非你主动做覆盖 - 为了让 2 的行为不要导致过量的
ApplicationContext在测试阶段被创建,可以把一些只有在生成环境才需要的额外的 Bean 放在独立的@Configuration类下,因为 Spring Boot 的 Testing slices 不会扫其他的@Configuration
维护一大堆 kubeconfig 的一些实践
2021 December-10
2021-12-20 更新
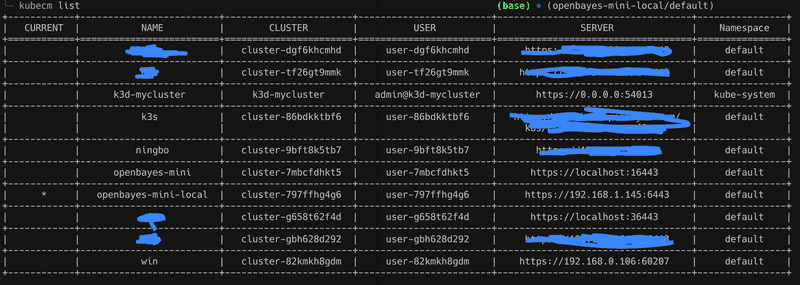
由于 kubie 是开一个子 shell 它会导致 direnv 失效,也就是说 kubie 和 direnv 无法共同使用,我只好再去尝试其他兼容的方案,毕竟如果换回 kubectx 就依然有维护 kubeconfig 的烦恼。这里找到一个新的工具 kubecm 可以帮助做 kubeconfig 的合并。
不过其实它也包含了 kubectx 的功能,但我的 kubectx 还提供了自动补全等东西,就这么一直用着了。
开始
如果需要维护很多 kubernetes 集群,每个集群都有一个 kubeconfig 的 yaml 那么在 ~/.kube 目录下就会有一大堆的 yaml 。在频繁切换和修改不同的集群的内容的时候,一个不小心就可能把 A 集群的东西部署到 B 集群造成运维事故。这里介绍下到目前为止维护对多个集群环境的一些痛点和实践。
首先先总结下痛点吧:
- 多个集群以及集群的 namespace 切换比较繁琐,通常需要 KUBECONFIG 环境变量的切换
- 不晓得自己当前处于哪个集群下
- 在使用 kustomize 或者 helm 对集群做更新的时候需要确保自己切换了 kubeconfig,除了小心之外没什么办法阻止错位的环境部署
下面记录下自己在试图解决这些痛点过程中找到的还不错的方案。
kubectx 快速切换上下文和 namespace
kubectx 可以切换 ~/.kube/config 文件中的多个 context,然后可以通过 kubens 命令切换不同的 namespace 。但如果我有一堆 kubeconfig yaml 的话还需要额外的一步,将它们合并到 ~/.kube/config 文件里。这个步骤用 kubectl 就能搞定:
KUBECONFIG=~/.kube/config:~/.kube/other.yaml kubectl config view \
    --merge --flatten > out.txt
不过依然是多了一步,而且既然有添加就有删除,如果其中一个集群的配置文件变化了或者废弃了就需要把这个集群剃掉:
kubectl config unset users.gke_project_zone_name
kubectl config unset contexts.aws_cluster1-kubernetes
kubectl config unset clusters.foobar-baz
zsh / bash / fish 集成展示当前 context
既然 kubectl config current-context 可以获取当前的上下文,那么如果可以在 shell 里面展示这些信息基本就可以保证自己知道当前在什么上下文了。对不同的 shell 可以用不同的方式实现类似的效果。
kube-ps1 for zsh / bash
安装成功后按照项目 README 提示就可以了。
custom function for fish
很遗憾 fish 里不能用 kube-ps1 不过找一个 shell 函数做的类似的效果也可以的:
function kubectl_status
  [ -z "$KUBECTL_PROMPT_ICON" ]; and set -l KUBECTL_PROMPT_ICON "⎈"
  [ -z "$KUBECTL_PROMPT_SEPARATOR" ]; and set -l KUBECTL_PROMPT_SEPARATOR "/"
  set -l config $KUBECONFIG
  [ -z "$config" ]; and set -l config "$HOME/.kube/config"
  if [ ! -f $config ]
    echo (set_color red)$KUBECTL_PROMPT_ICON" "(set_color white)"no config"
    return
  end

  set -l ctx (kubectl config current-context 2>/dev/null)
  if [ $status -ne 0 ]
    echo (set_color red)$KUBECTL_PROMPT_ICON" "(set_color white)"no context"
    return
  end

  set -l ns (kubectl config view -o "jsonpath={.contexts[?(@.name==\"$ctx\")].context.namespace}")
  [ -z $ns ]; and set -l ns 'default'

  echo (set_color cyan)$KUBECTL_PROMPT_ICON" "(set_color white)"($ctx$KUBECTL_PROMPT_SEPARATOR$ns)"
end

function fish_right_prompt
    string unescape $$_tide_prompt_var[1][1]
    echo (kubectl_status)
end
这个代码不是我原创的,我只是做了魔改,很遗憾忘记了出处...具体的代码在 fish_prompt 里,这里同时包含了我公开的 dotfiles 信息。效果如下:
注意 这个最终效果是建立在我的 fish 主题之上的,单独使用效果如何不得而知。
kubie 一站式解决方案
除了 kubectx 外我在最近装机的时候还发现了一个更完善的解决方案:kubie。它有三个优势:
- 包含了 kubectx 的功能
- 不用合并 config 文件,可以通过配置读取文件列表,甚至支持
~/.kube/*.yaml这样的通配符匹配 - 自带 shell 的 prompt 提示,类似于上文
kube-ps1的功能
当然,也有坏处:
- 你不能自定义你的 prompt 样式了,不过它支持关掉自己的 prompt 提示。我目前就逐渐从 kubectx 切换到了 kubie 但依然保持我自己的 fish 的 prompt 。
- 存在一个小问题(我觉得是 bug),它默认不把
~/.kube/config下当前的上下文认为是默认的上下文,它的 prompt 不会在你新建一个 terminal 的时候假设是没有上下文的,然而事实上在这个时候 kubectl 的 context 已经指向了~/.kube/config的上下文了。你需要做一次切换后才会弹出。
direnv 当切换目录后自动注入环境变量
最后一个痛点以上的东西都没有解决。虽然增加了提示很大概率可以避免用错环境了,但还是挡不住有手比眼快的时候。这时候就需要 direnv 救场了。它可以在切换到某一个目录的之后触发一个 shell 执行,比如我可以强制在切换到维护 dev 集群的目录时将 KUBECONFIG 环境变量切换成对应集群的 kubeconfig 文件,这样就可以保证了上下文随着我操纵的 kustomize / helm charts 文件目录自动切换了。
最后上 demo,这里包含了上述介绍的一些演示,顺序通过内部的标题组织的,和上述顺序不一致。


